
Adb program. Install and configure the system. Instruction
Virtually every owner of an Android device who decided to improve their pet by replacing the firmware or kernel of the operating system is faced with the adb program.
For most newbies, this program becomes an insurmountable obstacle and today we will tell you how to install and start working with this wonderful application that will help you, for example, get root rights on your device, flash a new version of Android, or even restore your phone or tablet to initial state after unsuccessful intervention in the system.
So what is ADB, beloved by all modders and hackers, where to get it, and why do we need it?
What is ADB .
The abbreviation ADB stands for Android Debug Bridge (Android debug bridge). ADB is part of the Android SDK , which can be downloaded from here .
Since the Android operating system is a type of Linux , it is often necessary to work through the command line to configure it. Of course, there are programs - terminal emulators that allow you to execute commands directly on the device but, firstly, on the small screen of the phone, it is inconvenient to do it, and secondly, access to the device is sometimes required through a computer, and in these and many other cases the program adb is simply irreplaceable. The adb program establishes a connection between a device and a computer and allows you to perform various manipulations with the Android system directly on your computer.
How to install ADB.
First of all, we recommend that you download the latest version of the Android SDK , at the time of writing this guide, the r11 version is available, using its example for all further description, and in earlier versions, the location of the necessary programs after installing the SDK may differ from that described here.
1. Download the Android SDK , it can be found at the link indicated earlier. There are several varieties of SDK , for Microsoft Windows, Mac OS and Linux .
We will need a version for Microsoft Windows . And here there are two options - download the installer or zip archive from the Android SDK. We do not need the installer, especially since it will not allow installing the SDK in Windows 7 , and therefore we download the zip archive.
The archive contains the android-sdk-windows folder, which contains the SDK itself. Unpack it on your computer. In our example, we placed the folder in the root of drive C. If you do the same, we will have the following path to the SDK : C: \ android-sdk-windows
In earlier versions of the SDK , the adb program we needed was located inside this folder in the tools folder, but it was later moved by developers to the platform-tools folder.
However, if you enter this folder, you will not find the adb program inside it, so proceed to the next stage of the installation.
2. Install the SDK Platform Tools .
We make sure that our computer is connected to the Internet and run the SDK Manager program in the android-sdk-windows folder. After starting the program, the following window will appear:
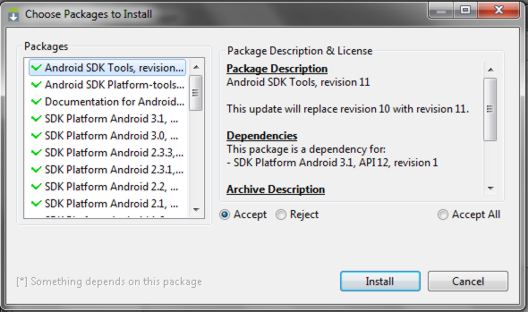
We need to download and install the Android SDK Platform-tools and Android SDK Tools .
Using a double click on an item or clicking on “ Accept ” and “ Reject ” mark these two items in the list and uncheck all other items, as shown in the screenshot above. Then click " Install " and wait until the necessary components are downloaded and installed.
Now we have adb installed on our computer, but to work with our phone or tablet it will be necessary to install their driver and for further convenience with the program, it would be nice to set the path to it and other components in the Windows system.
3. If we go to the C: \ android-sdk-windows \ platform-tools \ folder, now we can find the adb program there.
After that, we need to edit the system variable PATH so that each time you start the program and enter commands do not type the path to the program, which looks like this:
C: \ android-sdk-windows \ platform-tools \ adb
If you have never edited system variables, create a system restore point so that you can later restore it to its original state.
- If you have Windows 7 installed, right-click on the “ Computer ” shortcut, select “ properties ” and in the opened window select “ Advanced system settings ”.
- If you have Windows XP , right-click on " My Computer " and then on " Properties "
In the next window, on the Advanced tab, click on the Environment Variables button. In the list of " System variables " select the variable " path " and click the button " Change ... "
The variable editing window will open, and in the “ variable variable ” section at the very end of the line, after the semicolon, add the path to the tools folder and the platform-tools folder:
; c: \ android-sdk-windows \ tools; c: \ android-sdk-windows \ platform-tools;
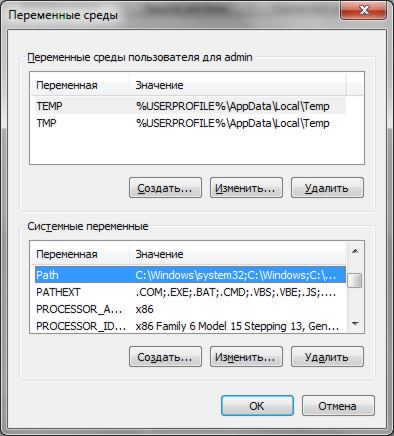
( if at the end of the line there was no semicolon, add it - each path in this line should be separated from the other by a semicolon )
If you installed the Android SDK in another folder, write at the end of the line your path to the tools and platform-tools folders.
Click " OK " to save the changes. After that, for the changes to take effect, you will need to restart the computer.
Installing device drivers.
Some devices, such as Samsung phones and tablets, have their own synchronization software with a computer, and if you have it installed on your computer, then the device driver is already installed on your system.
But for devices such as the Nexus One , which come without any additional programs and drivers, drivers must be installed to work with the Android SDK .
To do this, go to the folder where we installed the SDK and run the SDK Manager .
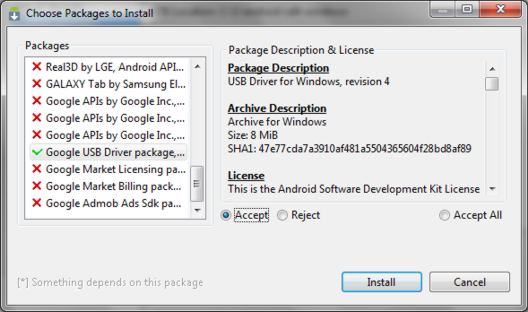
In the same way as we installed the Android SDK Platform-tools and Android SDK Tools , we find and select the “ Google Usb Driver package ” from the list. Click " Install " and wait while the program downloads the drivers. Drivers for 32 and 64 bit Windows will be downloaded to the following folder:
C: \ 1 \ android-sdk-windows \ extras \ google \ usb_driver
Now you can install drivers for your device. To do this, in the settings menu of the phone or tablet, select the “ Applications ” item (Applications), and in it turn on “USB debugging”.
We connect our device to the computer. The computer will detect new hardware and offer to install drivers. Install drivers from the folder where they were downloaded earlier.
After installing the drivers in the device manager, a new device “ ADB Interface ” will appear and we can verify this by opening it by right-clicking on the icon “ Computer ” -> “ Properties ” -> “ Device Manager ”
In addition, you can try to install on your computer universal adb driver .
How to run ADB
The best way to work with the adb program is through the Windows command line. To call the command line on a computer with Windows XP , click " Start " and in the input field " Run " type cmd and press "Enter".
On a computer with Windows 7 , click " Start " and in the input field "Find programs and files" type cmd and press "Enter".
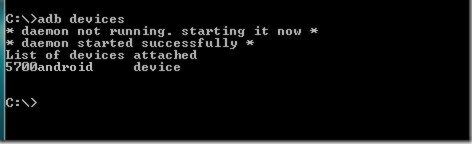
A command line window will open, and in order, for example, to see which devices we have connected to the computer, we type in the command
adb devices .
The adb program will display a list of devices currently connected to the computer.
How to connect via Wifi to Android device to work with adb - read adb over wifi using adbWireless. Instructions.
How to work with Adb with the help of a graphical interface, read: QtADB - a simple way to connect a tablet or smartphone to a computer via ADB