
How to partition a hard disk in Windows 10
- Hard disk partitions
- Prerequisites
- Concepts of understanding
- Check the method of storing information about disk partitions.
- Hard drive partitioning
Read how to split the HDD or SSD disk into sections using the built-in Windows 10 tools . Detailed step by step instructions. The hard disk is one of the main elements of modern computers, which allows to record, process and store all user information and computer management systems. For the convenience of the user, the space on the internal hard drives is segmented (“split” into sections). Partitioning is usually used to separate operating system files from other user files.  Content:
- Hard disk partitions.
- Prerequisites
- Concepts of understanding.
- Check the method of storing information about disk partitions.
- Partitioning the hard disk.
Hard disk partitions
Your internal hard disk may already have two or three partitions. A computer technician originally did all the partitioning work for you. But there are times when you need to change the configuration of an existing partition or divide it into two or more partitions. As it may seem from the first time, this is a very complicated process, but this is not the case. And although the procedure for partitioning a hard disk requires special care and caution, it is still simple enough for any responsible user to perform. It also does not require the installation of third-party applications, which makes its use more convenient.
Device Manager has a built-in function called "Disk Management" , which allows you to partition a disk, and is quite easy to use. If you are using a version of the operating system "Windows 10 Creators Update" or higher , then you can use the "Disk Management" function to separate a USB drive or SD card. However, in this article we will only talk about how to partition the hard disk.
Thus, using our algorithm, you can separate both internal and external hard disk. If you have a solid-state hard drive (SSD) installed, it can also be partitioned in the same way.
Prerequisites
To partition the hard drive in “Windows 10” you must have administrator rights and access to the hard drive connected to your operating system. If you plan to split an external hard drive, then make sure that it is conveniently located on a surface that prevents it from being accidentally disconnected during the separation process.
Concepts of understanding
A hard disk is a mechanical element. To understand the principle of separating a hard disk, let's draw an analogy with a flat. Imagine a studio apartment in front of you when all the space around is one big room and the bathroom adjacent to it. This is a clean hard drive when it is not yet partitioned, representing one large amount of storage space with one small partition for the recovery disk.
Suppose now you decide to turn this one-room apartment - studio into an ordinary apartment, that is, add additional rooms. In essence, what you decide to do is to divide your apartment into different parts, by analogy, to divide your hard disk into partitions. When you start laying walls to divide the space of an apartment - studio, you have complete freedom of choice to decide where the first wall will be, that is, how large or small your first section will be. After you have successfully divided your hard disk into two partitions, your ability to partition the hard disk is reduced. And you need to be careful when sharing the next section.
It must be remembered that there is a limit on the number of sections you can create. If your hard disk has a way to store information about the “MBR” disk partitions , you can create up to four partitions and nothing more. If the way your information is stored is “GPT” , then you can create an infinite number of partitions.
Check the method of storing information about disk partitions.
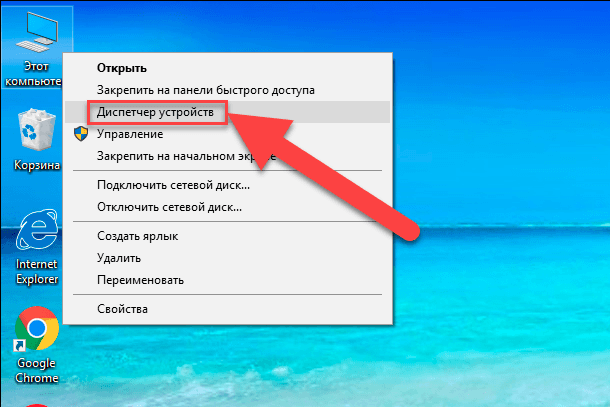
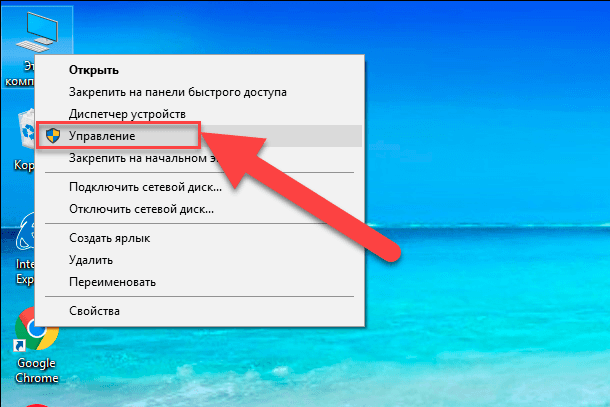
To determine how to store information about disk partitions, follow these steps. On the desktop, right-click on the “This Computer” shortcut and select the “Device Manager” link in the pop-up menu.
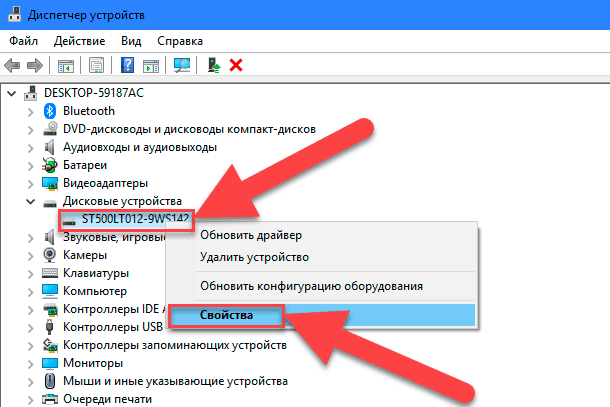
In the dialog box that opens, check the "Disk devices" section . You will see a list of hard drives installed on your computer. Mark the necessary disk and click on it with the right mouse button, in the appeared menu select the link “Properties” .
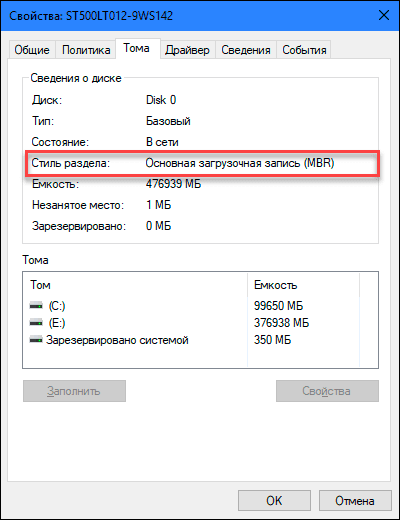
In the "Properties" dialog box in the "Volumes" section , click the "Fill" button.
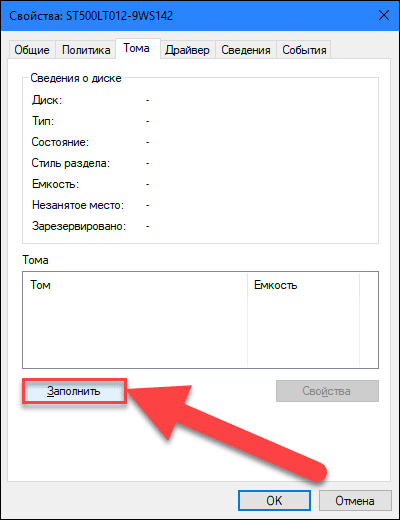
All available information about your disk will be listed in the "Disk Information" section. Check the “Partition Style” line to find out what method of storing information about disk partitions is used on your disk.
Hard drive partitioning
To start on the desktop, right-click the "This Computer" icon and select the "Manage" link from the pop-up menu.
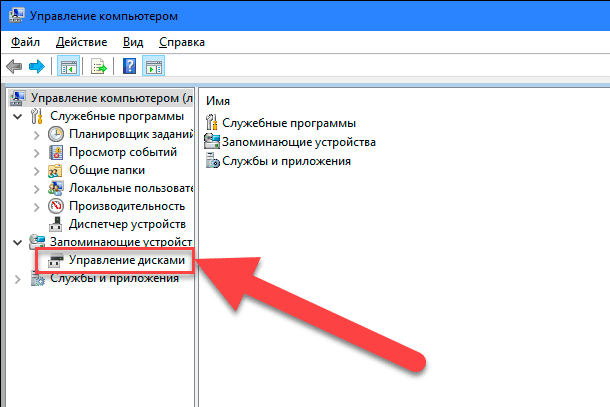
You will see the Computer Management dialog box. In the side menu on the left side of the screen, select the “Disk Management” section.
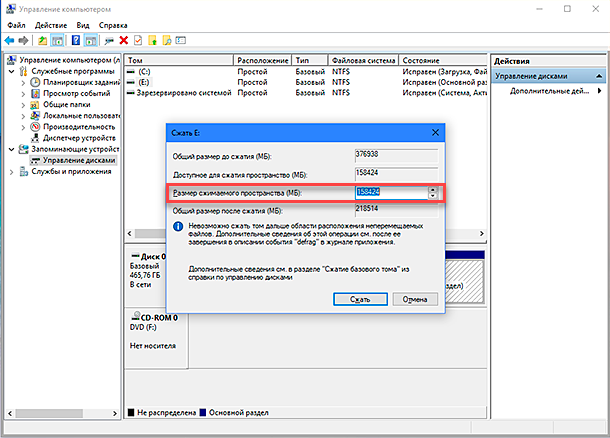
In the middle pane of the dialog box, you will see a list of all partitions on the selected hard disk. In our case, we will create a section in the already existing section "E" . If you have a disk without partitions, then perform the same algorithm for it. Right-click on your unpartitioned disk (in our case, E section ) and select the Compress Volume link. Computer Management Service "Windows 10" will check what the maximum amount of disk space you can use to create a new partition. It does this in order to ensure that none of your files will be lost upon completion of the split procedure. The newly created section will not contain any files.

For example, if you have a 1 TB hard drive on which 800 GB is occupied by saved files, then you cannot and should not attempt to partition 500 GB each. The Windows Computer Management Service will not be able to compress the volume beyond the unmovable files location. Therefore, after obtaining the results of the available space for compression, select the size of the future section with the options offered. Best of all, if you do not have saved files on the disk, although this is not always the case (as in our case).
Be careful when choosing a partition size - this is really the only difficult part. Ensure that the size of the new partition does not exceed the size specified in the “Compressible Space (MB)” row. Further, the whole process is no longer difficult, click "Squeeze" to start it.
Then grant the computer management service permission to assign a new section, that is, assign a letter to the section. And also answer the question of the service about the need to format the newly created section. It is better to perform formatting immediately in order to fully prepare the section for work. Upon completion, a new section will appear in the middle pane of the Computer Management menu next to the existing sections.
If the new section is displayed as a “RAW” space, right-click on it and select a format from the context menu. This completes the hard disk partitioning process. If you want, you can divide the disk space of your hard disk into the number of partitions you need. However, remember that the number of partitions that you can create depends directly on the way information is stored on your hard disk (no more than four partitions for the “MBR” and an unlimited number of partitions for the “GPT” ).
If you install “Windows” and plan to divide the hard disk into partitions, then the best solution would be to use the standard “Windows” service for managing disks. It greatly simplifies the process of creating, dividing and formatting partitions in “Windows” .